Battery switch on travel trailer function is crucial for managing your RV’s power. Understanding how these switches work—whether it’s a simple 1-2-both-off or a more complex system—is key to safely and efficiently using your trailer’s electrical system. This guide will break down the different types, their functionalities, troubleshooting common problems, and essential safety tips to keep your travel trailer running smoothly.
We’ll explore the inner workings of various battery switch designs, how they interact with shore power, alternators, and solar panels, and provide practical advice on maintenance and troubleshooting. Learn how to optimize your power usage, extend battery life, and avoid common mistakes that can lead to electrical issues.
Battery Switch Types in Travel Trailers
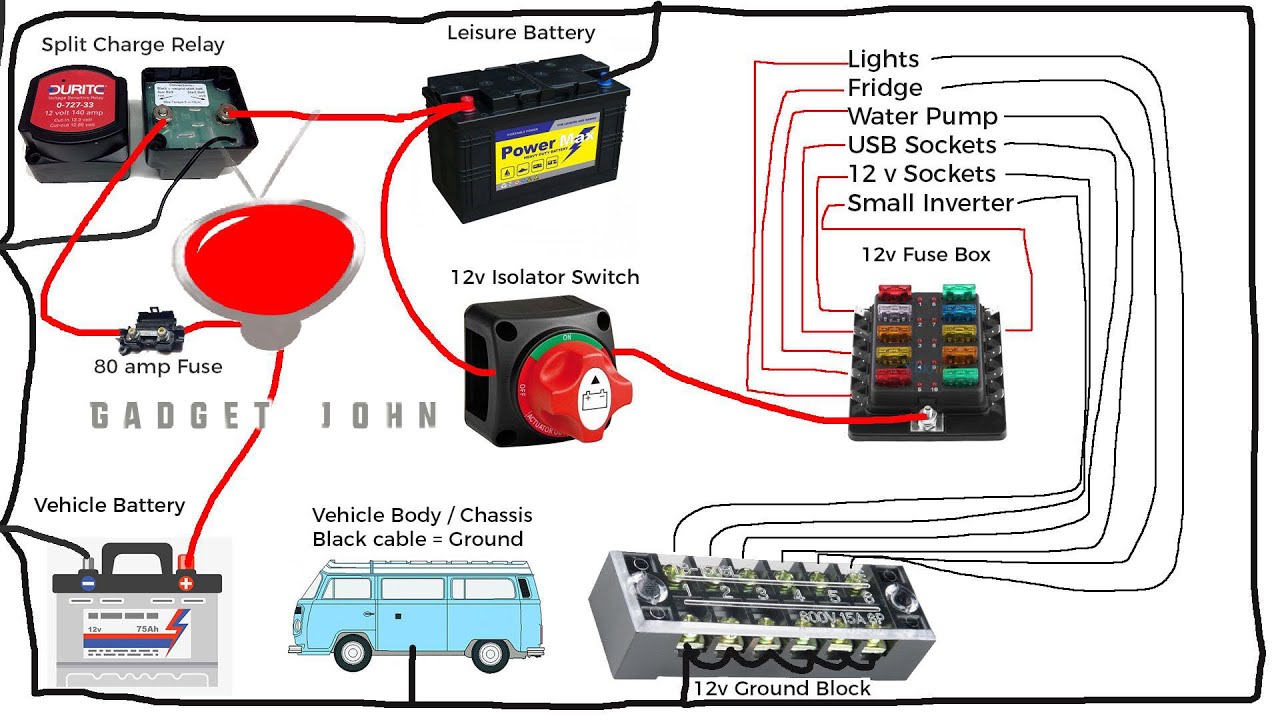
Choosing the right battery switch for your travel trailer is crucial for managing your power sources and ensuring safe operation. This section details the common types available, their inner workings, and installation. Understanding these differences will help you select the best option for your needs.
1-2-Both-Off Battery Switches
This is the most common type of battery switch found in travel trailers. It allows you to isolate either the house battery (Battery 1), the chassis battery (Battery 2), both batteries, or completely disconnect both from the system.The internal workings involve a series of contacts that are mechanically switched using a rotary selector. The diagram below illustrates a simplified representation:
| Position | House Battery (Battery 1) | Chassis Battery (Battery 2) | Load |
|---|---|---|---|
| 1 | Connected | Disconnected | Connected to Battery 1 |
| 2 | Disconnected | Connected | Connected to Battery 2 |
| Both | Connected | Connected | Connected to both Battery 1 & 2 |
| Off | Disconnected | Disconnected | Disconnected |
Advantages include simplicity and ease of use. Disadvantages include the inability to combine the batteries’ power for increased capacity. Installation involves connecting the positive and negative cables from each battery to the switch terminals, and then connecting the load cables to the appropriate output terminals according to the switch’s labeling.
1-2-Battery-Combine Switches
This type of switch offers the additional functionality of combining the house and chassis batteries in parallel. This increases the overall available amperage, useful for running high-demand appliances.Internally, this switch uses a more complex arrangement of contacts. In the “Combine” position, the batteries are wired in parallel, effectively doubling the available capacity (assuming both batteries are of equal capacity and state of charge).
| Position | House Battery (Battery 1) | Chassis Battery (Battery 2) | Load |
|---|---|---|---|
| 1 | Connected | Disconnected | Connected to Battery 1 |
| 2 | Disconnected | Connected | Connected to Battery 2 |
| Combine | Connected | Connected | Connected to both Battery 1 & 2 in parallel |
| Off | Disconnected | Disconnected | Disconnected |
Advantages include increased power capacity when combining batteries. Disadvantages are slightly increased complexity and potential for issues if the batteries are significantly different in voltage or state of charge. Installation is similar to the 1-2-Both-Off switch, but requires additional connections to facilitate the parallel connection in the “Combine” position. Careful attention to wiring diagrams is crucial for correct installation.
Installing a Battery Switch
Before installingany* battery switch, always disconnect the negative terminal from both batteries to prevent accidental shorts. Always follow the manufacturer’s instructions included with your specific switch. Properly sized wire and appropriate connectors are essential for safety and reliable operation. Improper installation can lead to electrical fires or damage to your RV’s electrical system.
Troubleshooting Common Battery Switch Issues
Your travel trailer’s battery switch is a crucial component, controlling power flow to your house batteries. Problems with this switch can leave you stranded without lights, appliances, or even the ability to charge your batteries. Understanding common issues and troubleshooting steps will help you quickly resolve problems and get back to enjoying your adventures.
Common Battery Switch Problems and Troubleshooting
Several issues can arise with your travel trailer’s battery switch. These typically manifest as no power to the trailer, inconsistent power, or even overheating of the switch itself. A methodical approach to troubleshooting is essential for efficient repair.
So, you’re an audiophile who loves to travel? Awesome! Check out this guide on creating the perfect audiophile travel setup to ensure your tunes sound amazing wherever you go. Knowing how to manage power is key though, especially if you’re using a travel trailer. Understanding the battery switch on travel trailer function is crucial for preventing dead batteries and keeping your music playing all day long.
It’s all about balancing your audiophile needs with the realities of portable power!
Visual Inspection Procedures
Before diving into electrical testing, a thorough visual inspection is vital. Look for obvious signs of damage, such as loose connections, corrosion on terminals, burnt wires, or physical damage to the switch housing. Pay close attention to the wiring harness leading to and from the switch. Any frayed, melted, or broken wires should be addressed immediately. Check for any signs of overheating, like discoloration or warping of the plastic around the switch.
So, you’re an audiophile who loves to travel? Awesome! Check out this guide on creating the perfect audiophile travel setup to ensure your tunes are always top-notch, no matter where you roam. And speaking of travel, don’t forget the practical stuff; understanding the battery switch on travel trailer function is crucial for powering your gear and avoiding a dead battery situation.
Properly managing your power source is just as important as your killer playlist!
Tighten any loose connections using the appropriate tools, ensuring a secure connection. Clean corroded terminals with a wire brush and baking soda paste, followed by a thorough rinsing with water.
Troubleshooting Table
| Symptom | Possible Cause | Solution |
|---|---|---|
| No power to trailer | Switch is off. | Turn the switch to the “on” position. |
| No power to trailer | Blown fuse or tripped breaker in the switch or main power panel. | Check and replace the fuse or reset the breaker. |
| No power to trailer | Faulty battery switch. | Replace the battery switch. |
| Inconsistent power | Loose connections. | Tighten all connections at the switch and battery terminals. |
| Inconsistent power | Corroded battery terminals. | Clean battery terminals with a wire brush and baking soda paste. |
| Inconsistent power | Faulty battery switch. | Replace the battery switch. |
| Overheating switch | High current draw. | Identify and address the source of high current draw (e.g., faulty appliance). |
| Overheating switch | Loose connections causing high resistance. | Tighten all connections. |
| Overheating switch | Faulty switch. | Replace the battery switch. |
Troubleshooting Flowchart, Battery switch on travel trailer function
This flowchart guides you through a systematic approach to diagnosing battery switch problems:Start -> Is the switch in the “on” position? -> Yes: Proceed to step 2; No: Turn the switch “on” -> Does the trailer have power? -> Yes: Problem solved; No: Proceed to step 3 -> Check fuses and breakers -> Are fuses blown or breakers tripped? -> Yes: Replace fuses or reset breakers -> Does the trailer have power?
-> Yes: Problem solved; No: Proceed to step 4 -> Visually inspect the switch and connections -> Are there loose connections, corrosion, or damage? -> Yes: Tighten connections, clean corrosion, repair damage -> Does the trailer have power? -> Yes: Problem solved; No: Proceed to step 5 -> Test the switch with a multimeter (consult electrical diagrams) -> Is the switch faulty?
-> Yes: Replace the switch -> Does the trailer have power? -> Yes: Problem solved; No: Consult a professional.
Battery Switch and Power Management Systems: Battery Switch On Travel Trailer Function

A battery switch is a crucial component in a travel trailer’s power system, acting as the central control point for your house batteries. It doesn’t work in isolation, though; its function is deeply intertwined with other power management systems, influencing how efficiently your trailer uses energy and extends battery life. Understanding this interaction is key to maximizing your off-grid capabilities.The battery switch interacts directly with several key systems.
The most prominent are the inverter, which converts DC power from your batteries into AC power for appliances, and the converter, which transforms AC power from your shore power connection into DC power for charging the batteries and powering 12V devices. The switch determines which power source is active and how power flows between them. For example, with the switch in the “off” position, the house batteries are completely disconnected from the rest of the system, preventing accidental discharge.
In the “battery” position, the batteries are connected to the 12V system, powering lights and other DC appliances. In the “both” position (if available), both shore power and the batteries supply power, typically with the converter charging the batteries from shore power.
Battery Switch Power Management Strategies
Different battery switch configurations offer various power management approaches. A simple on/off switch provides basic control, while more sophisticated switches, such as those with multiple banks or an auxiliary switch, allow for more refined management. These can prioritize different power sources based on availability and state of charge, optimizing power consumption and prolonging battery life. For example, a switch with a dedicated “start” position allows you to use your starting battery (separate from the house battery bank) without draining the house batteries.
A more complex system might incorporate a battery management system (BMS) which automatically manages charging and discharging to protect batteries from overcharging, deep discharge, and other issues.
Schematic Diagram of Power System Interactions
The following table illustrates a simplified schematic of how a battery switch interacts with other power management components in a typical travel trailer. Remember, specific configurations vary greatly depending on the trailer and its systems.
| Component | Description | Connection to Battery Switch |
|---|---|---|
| Shore Power Inlet | Provides AC power from campground hookups. | Connects to the converter. |
| Converter | Transforms AC to DC power for charging batteries and powering 12V devices. | Receives power from shore power inlet and connects to the battery switch (and batteries). |
| Battery Switch | Controls the connection of the house batteries to the system. | Connects to the house batteries and the 12V system. |
| House Batteries | Provides DC power for appliances and systems when off-grid. | Connected to the battery switch. |
| Inverter | Transforms DC power from batteries to AC power for appliances. | Receives DC power from the battery switch (and batteries). |
| 12V System (Lights, Pumps, etc.) | Various 12V appliances in the trailer. | Receives power from the battery switch (and batteries, or converter). |
Best Practices for Optimizing Power Usage
Effective use of your battery switch is vital for extending battery life and preventing unexpected power outages. Prioritize turning off appliances and lights when not in use. Regularly check the battery’s state of charge to avoid deep discharges. Use the battery switch to disconnect the batteries when not using the trailer for extended periods to prevent parasitic drain.
Consider investing in a battery monitor to keep track of your power usage and battery health. When connected to shore power, ensure that the converter is charging the batteries effectively. Avoid running high-power appliances like air conditioners or microwaves for prolonged periods off-grid.
Mastering your travel trailer’s battery switch is essential for a safe and enjoyable RV experience. By understanding the different types of switches, their functionalities, and the importance of regular maintenance, you can prevent costly repairs and ensure your power needs are met. Remember to always prioritize safety when working with your RV’s electrical system. With a little knowledge and care, you’ll be confident in managing your trailer’s power and enjoying worry-free adventures.
Question Bank
What happens if my battery switch is faulty?
A faulty switch can lead to no power, inconsistent power, or even overheating. This could leave you without lights, appliances, or the ability to charge your batteries.
How often should I inspect my battery switch?
Regularly inspect your battery switch at least once a year, or more frequently if you use your trailer often. Check for corrosion, loose connections, and any signs of damage.
Can I use a battery switch with different battery types?
Generally, yes, but it’s crucial to ensure the switch’s amperage rating is sufficient for the combined amperage of your batteries. Mixing battery chemistries (e.g., lead-acid and lithium) might require additional considerations and possibly a specific type of switch.
How do I know which type of battery switch I have?
Check the switch itself for markings indicating the type (e.g., 1-2-both-off). You can also consult your RV’s wiring diagram or owner’s manual.
